“Do I need a vapor barrier under vinyl plank?” is one of the top questions we hear—especially for basements and concrete slabs along the Front Range. This guide explains what a vapor barrier actually does, how it differs from underlayment, and the simple tests a flooring contractor uses before any floor remodel. You’ll also see common mistakes that void warranties and how to choose a moisture setup that plays nicely with today’s LVP and even adjacent hardwood flooring.
TL;DR
- Vapor barrier = moisture control; underlayment = comfort/sound. Some LVPs have attached pads—don’t double up.
- Subfloor drives the decision: slabs/basements often need a barrier; plywood over a conditioned space may not.
- Test before you install; follow the LVP brand’s warranty language.
Vapor Barrier vs. Underlayment: What Each One Actually Does
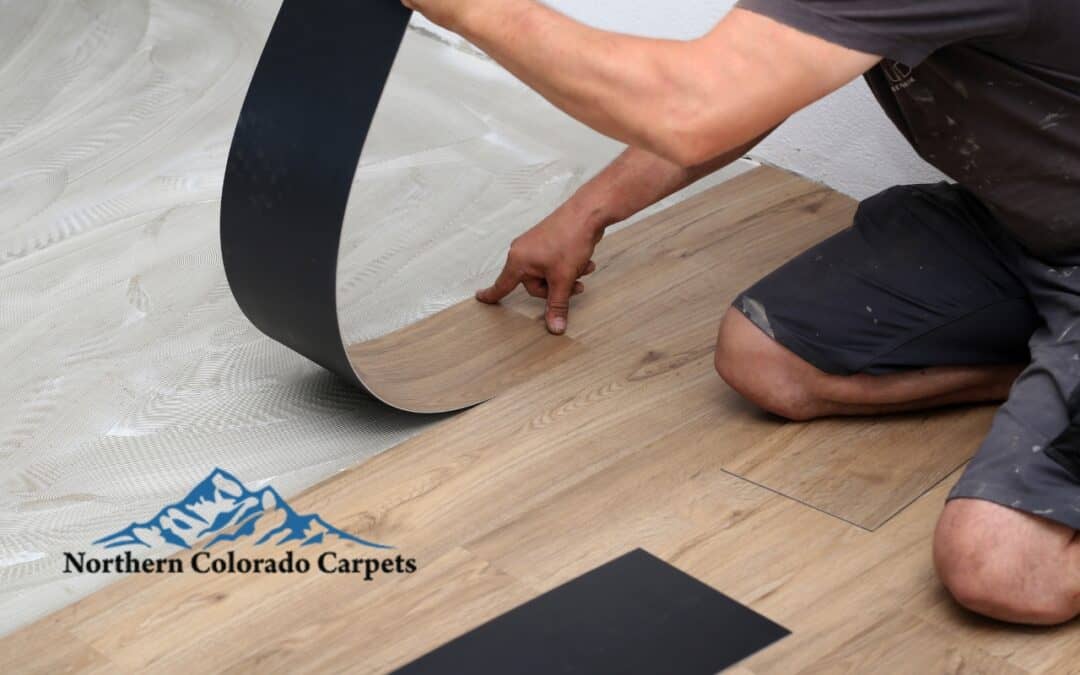
Think of a vapor barrier as moisture management. On concrete or below-grade spaces, ground moisture can pass as vapor through the slab. A 6-mil (or manufacturer-specified) poly sheeting blocks that vapor so it doesn’t condense under your LVP and cause odor, mildew, or seam issues. An underlayment, by contrast, is about comfort and sound: it cushions footfall noise, smooths tiny imperfections, and can offer minor thermal comfort. Some LVP products include an attached pad; that pad is underlayment, not a vapor barrier. Most brands still require a separate film on concrete even when a pad is attached.
Why it matters in Northern Colorado: winter snowmelt, spring swings, and basement humidity challenge floors. If your LVP’s warranty calls for a barrier over slab, use it—period. In mixed projects where hardwood flooring meets LVP, proper moisture layers under the vinyl help protect adjacent hardwood flooring from seasonal humidity swings, too. A local flooring contractor will match the barrier, pad, and installation method (float vs. glue) to your space so your floor remodel performs in January and July alike.
Want us to check your product’s exact requirements? Schedule a quick spec review and bring the LVP brand—we’ll confirm barrier/underlayment needs and transitions to hardwood flooring.
Subfloor Matters: Concrete Slab, Basement, Crawl Space, or Plywood
Your subfloor type decides the moisture game plan:
- Concrete slab (at grade or below grade): Most floating LVP requires a continuous 6-mil poly vapor barrier taped at seams and lapped up the perimeter (trim covers it). If your LVP has an attached pad, the film still goes under the pad unless the manufacturer explicitly says otherwise. Over time, this keeps vapor from collecting beneath the plank and protects neighboring hardwood flooring at transitions.
- Finished basement: Same as slab—plus be extra careful around floor drains, utility closets, and exterior doorways where snowmelt enters. A barrier reduces the risk of musty smells and helps your floor remodel maintain a stable feel year-round.
- Crawl space below: If you’re installing on a wood subfloor above a vented crawl, first ensure the crawl has its own ground vapor retarder and adequate ventilation or conditioning. Many LVPs over plywood do not need a separate film on top of the wood; they want a specific underlayment or the product’s attached pad only. Adding plastic on top of plywood can trap seasonal moisture and telegraph issues into hardwood flooring nearby.
- Plywood/OSB over conditioned space: Often, no vapor barrier is required above the deck. Instead, follow brand guidance for underlayment or go directly with the attached pad. Focus on flatness (grind/sand high seams, fill low areas), because LVP tolerances are tight and the right prep protects transitions to hardwood flooring during your floor remodel.
When in doubt, follow the LVP manual and ask your flooring contractor to verify your assembly. That’s how you avoid “looked fine at install” surprises six months later.
Moisture Testing 101: Simple Ways Pros Check Before Installing
Moisture isn’t guesswork. Before installing over concrete, pros use:
- RH in-situ probes drilled into the slab to read internal relative humidity.
- Calcium chloride (MVER) tests to measure vapor emission rates.
- Plastic sheet test (a quick screening tool): tape clear plastic to the slab for 24–72 hours; visible condensation means slow down and re-test formally.
- Pinless moisture meters for wood subfloors to ensure they’re within range and compatible with adjacent hardwood flooring.
Results drive the assembly: borderline slabs may need a higher-spec vapor retarder or switching from float to a warranted moisture-tolerant adhesive system (if your LVP allows glue-down). Testing also informs acclimation. While LVP is dimensionally stable, your flooring contractor still conditions materials and the jobsite, so the floor remodel doesn’t fight the seasons. Accurate tests today are far cheaper than replacing planks and base later—especially where LVP meets hardwood flooring and tile at multiple heights.
Need testing before you commit? Book an in-home evaluation. We’ll measure, recommend the right barrier, and map clean transitions to hardwood flooring.
Common Mistakes: Trapping Moisture, Wrong Products, and Warranty Issues
The biggest install failures come from stacking the wrong layers. Don’t double underlayments—if your LVP has an attached pad, adding a second pad can cause excessive deflection, joint stress, and noise. If the slab needs a vapor barrier, use the poly film under the pad, not another cushion. Don’t use carpet pad under LVP. It compresses, moves, and can void warranties.
Edge sealing errors are another trap: vapor barriers should be continuous and taped at seams; however, don’t caulk the perimeter to the wall unless the manufacturer says so. LVP needs expansion space; sealing that gap can trap incidental moisture and buckle planks. Skipping slab flatness also invites problems—LVP wants very flat floors. Level first, then lay.
Finally, ignoring the book: each LVP brand’s warranty spells out barrier thickness, approved underlayments, and whether a barrier is required over wood vs. concrete. Following those details protects the LVP and adjacent hardwood flooring while keeping your floor remodel covered if anything goes sideways. A seasoned flooring contractor will document products and keep packaging/labels for your records.
Bottom Line: The Right Moisture Setup for a Trouble-Free LVP Install
Yes—you often need a vapor barrier under vinyl plank on concrete slabs and basements in Northern Colorado. On plywood over a conditioned space, you usually don’t; you’ll use the approved underlayment or the LVP’s attached pad instead. Test first, match layers to the subfloor, and follow the brand’s warranty so your LVP (and neighboring hardwood flooring) stays quiet, clean, and stable.Contact us or schedule a free in-home estimate. Northern Colorado Carpets—your Fort Collins flooring contractor since 1976—will specify the right vapor barrier, underlayment, and transitions to tile and hardwood flooring for a smooth floor remodel.
Recent Comments